New Blood: Introducing Tony Ton
We would like to introduce a new contributor to the Lineweights website, our good friend Tony Ton. Tony has a great eye for design and loves to sketch! Welcome Tony, looking forward to more sketches to come!

Posts Tagged ‘ industrial design ’
We would like to introduce a new contributor to the Lineweights website, our good friend Tony Ton. Tony has a great eye for design and loves to sketch! Welcome Tony, looking forward to more sketches to come!
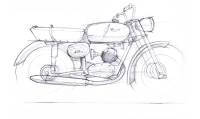
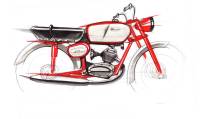
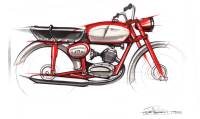
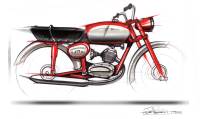
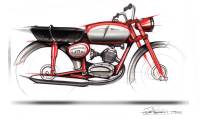
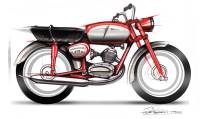
I have been meaning to sketch out my motorcycle (my grandpa’s old bike) for some time now. I started with just a simple papermate fine point on marker paper with the sketch below. Feeling out the shapes, silhouette, proportions and placement of each part. There is lots of room in the engine area, because Benelli used this frame for 4 different size engines (125, 175, 250 and 360cc!). Click on each image below for the step by step demonstration!


When I originally started SJSU, I was declared in Graphic Design. My first semester in the major I decided to take an Industrial Design class as one of my electives. I was pretty excited to get into the class, since we would be learning how to “sketch like the star wars artists!” Dave Fleming was the professor for the class, and I heard murmurs from other students that we were really fortunate to have him! Each day, Prof. Fleming would bring in new and exciting materials to learn to sketch with. We would gather around his desk, every other class session, to watch him sketch. I tried to take as many notes as I could, but it was not only hard to keep up, but many times I would just watch in awe. (read more below)


Right from the beginning we were tossed into the pool, expected to know how to swim. Our perspective training was basically a one week recap, from there, we went full bore into all sorts of materials, lighting, shadowing, coloring, textures, etc. We got lots of encouragement and inspiration from Prof Fleming, and he always had lots of saying to carry us through the semester. It was tough to keep up, but once the class was over, I was really thankful for what Prof Fleming taught the class. On the last day of class Prof Fleming came up to me to give me my grade and he said…”you know, I would really think about changing over from Graphic Design to Industrial Design…you have the eye for it”…from that point forward my life was changed forever. Thanks Professor Fleming for all the encouragement, education and inspiration! Check out his old school work below… and his most current paintings here.. http://www2.cruzio.com/~fleming/
We had such a great opportunity this year to teach Viz 1 @ SJSU and what a journey it has been! We would like to thank our class for all their hard work and dedication this semester and especially for weathering the tough critiques…they certainly poured out the mileage…just to remind everyone this is the first design course in our ID program, so there is still much to be learned and gained, and after their performance we definitely believe they are ready to kick ass in Viz 2…
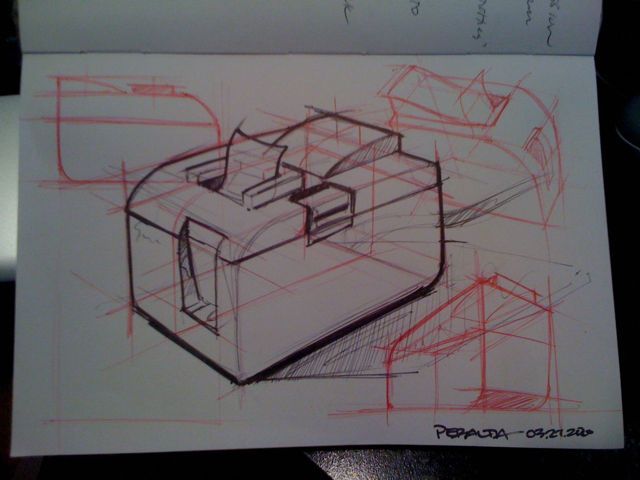
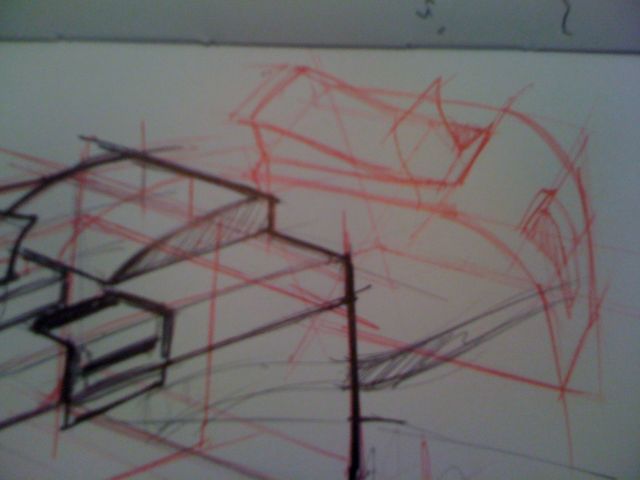
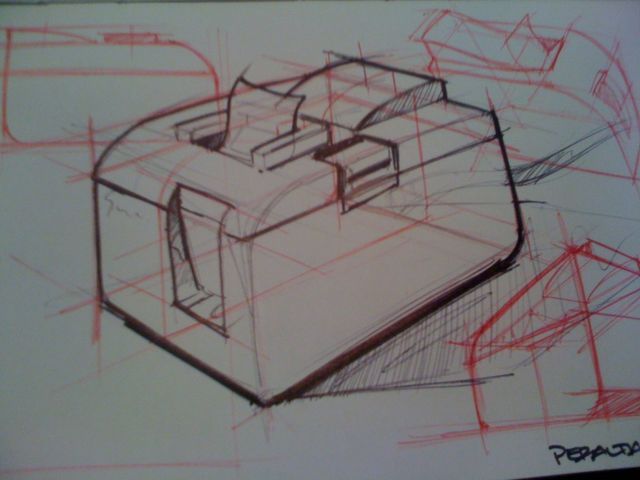
This was their final…to redesign a housewares product…show us your understanding of perspective, construction, lineweight, rendering in monochrome (baby steps before color), shadows, and of course their first stab at redesigning something…here are some snap shots of what they presented to us…

We posted up their first day sketches (they were so embarrassed) and had them post their finals directly underneath to show their progress, or not.

To help them drive their designs and push their boundaries, we had them create inspiration boards, from steam punk to aliens that exercise really drove them.

From fun and whimsical to modern to speed and flow…

Construction, perspective, quick thumbnails for concept generation, and monochromatic renders (next term will be color and materials)
Again, thank you to our class…remember to keep on sketching over the summer, keep it loose, and never get complacent, always hungry-never full!
Recently we were having a bit of trouble reformatting and reshaping what Lineweights would look like. We finally, after a bit of digital wrestling with CSS…got it looking all shiny and new! Hope you like it!
If you have any comments or feedback, it would be great to hear from you. You can email us @ lineweights@gmail.com
Enjoy!

Yesterday I had to step out of class for about 20 minutes, so that the students could take a Teacher Evaluation of the Vis class Jon and I taught this semester. The semester has gone really well, and I think that we effectively passed on sketching knowledge….but there is something to be said when all those pencils are sitting and writing about your teaching performance. Its like all weapons are now pointed at you! Flipped through the Art of Star Wars and decided to sketch the ship I would need to break back into that classroom!

It’s always so nice to step into the old studio where you: spent days and nights sketching and cad’d it up in, drowned yourselves in rockstar drinks, almost OD and die on redline, crashed out on the couch or table and woke with magoo all up in your face, got yelled at for bringing foam into, glued gi joes to the ceiling, discovered goatse and tubgirl (do not ask), puked all over the tables after a rough night of drinking, etc….
….Dom and I broke back into the room where it all started for us this past weekend (the old ID Studio @ SJSU) and were so happy to see sketches on the walls, messy tables, new couches (thank god), and the biggest time waster-the dart board…
Here are a few of the sketches on the walls…you guys make us so proud and keep on sketching…and thanks ID Room for all the memories!!!


Really quick printer sketch… bic ball point black/red on bond paper.
Chair project I did back inschool (prisma+ballpooint):

Its been some time since I had to opportunity to post anything up here. So, here are some quick sketches and color studies from my portfolio that I did back in school.
Pretty straight up…time to draw a Smart Car! They have such cool little personalities, it makes it easy to capture the character like feel that these cars have. Used a ultra fine point Sharpie and Pentel Sign Pen to bold up the out side lines. Keep it loose and free… Enjoy!

Curvilinear Forms can be some of the toughest things to sketch in perspective, but when you nail it they can shine for you. This technique reaches back to my first Visualization class with Dave Fleming at San Jose States Industrial Design Dept. Follow each step, and you will learn to build 3D curvilinear forms on paper!

1. Perspective, Proportions and Connections: Sketch your initial box forms. Take a look at the proportions of the two boxes in relationship to each other (they are the major bodies of the object). Once you are happy with the proportions, connect the two boxes, and find the center line of both boxes.

2) Contour lines, Center lines, Radi and More: Use your sketch from step one asn an underlay to make the second sketch. Lightly ghost the key points from the original sketch (as visual reference). Start to “shape” the boxes into softer forms, paying attentions to the outside profile to maintain the correct perspective position of those curves. Use crossing contour lines to help describe to your eye how you see those new shapes. Add curves and Radi based off of those contour lines. Make sure that the center lines now live on both forms.

3) Final Shape, Details Texture and Preparation: Use the sketch from step 2 to help create your final shape. Adjust curves and contours to fit your design, always referencing your previous sketch. Place key details that play a big part in the design on the object, always looking to see if center lines/ contour lines hit those objects (this can help play up certain details). Always follow the surfaces you have built to make details more realistic. Add textures if necessary to separate forms, and the sketch is prepared for value and shading!
Enjoy!
Feeling tired and rusty? Been a while since you last sketched? Need a pick-me-up, that will get your marker started? Sketching warm ups are the best way to break that silence between your pen and paper. It will help your brain visualize your next move and learn to build confident lines. This technique shown here is most commonly taught at Art Center in Pasadena, and Scott Robertson being the biggest proponent! I threw on his DVD and did a little sketch warm ups.
Click on the photo to take you over to the full Sketch Warm Up, filed under Tutorials and Techniques page!


![3628692459_fb755191a7[1]](https://live.staticflickr.com/2581/3682050553_72c5080af1_s.jpg "3628692459_fb755191a7[1]")
![3628695853_a1e6a40195[1]](https://live.staticflickr.com/3568/3682863860_b7c69e3aea_s.jpg "3628695853_a1e6a40195[1]")
![3629536468_4c1c67e0c2[1]](https://live.staticflickr.com/2470/3682050349_88c7a10598_s.jpg "3629536468_4c1c67e0c2[1]")
